Key Points for Ice Travel
Learning to recognize a range of ice features and potential problems is helpful for avoiding hazards. Preparing yourself for when you get it wrong (and sooner or later you will) is just as important. The eight points listed below are the main ways to avoid trouble or to minimize its effect when you find it.
1) Use Your Head
Outcomes (good and bad) come from a combination of competence and luck. Since we have no control of luck, competence is our only defence against bad outcomes. Competence comes from a combination of experience, understanding, skills, proper equipment and prudent judgment.
2) Be Ready if things don't go as planned
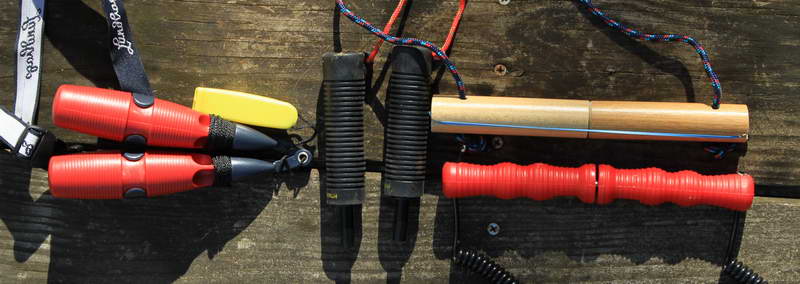
Judgment is never perfect and no ice is completely predictable. It is OK to hope for the best but it is more important to prepare for the worst. Be disciplined about never going on ice without ice claws. It is helpful to practice using them and the best practice is done on real ice with full gear.
Ice claws shown in the picture above are the most basic tool. They make getting back on the ice much easier. The best ones are made in Sweden for skaters and are shown on the left end of the picture.
A throw rope will make rescuing a wet friend easier, safer, more likely to succeed and less likely to end with both the victim and rescuer in the water. In most rescue situations it is best to call 911 before doing anything else. This gets back-up on the way. They would much rather be called and not needed than not called when they might be needed.
A tool for testing the ice will significantly reduce the chance of falling through compared to the widely used 'body weight test method'. This is even more important (and more difficult) when vehicles are involved. A cell phone in a waterproof bag, foot traction and a change of clothes are important additions. More..
Go in a group. The optimum group size is in the 3-6 person range but two is significantly better than one. Your safety margin is worse if you are alone.
Carry a change of clothes in a waterproof bag or wear protective clothing (wet suit, dry suit, exposure suit or similar).
If you have made these preparations and practiced using them, falling through can seam easy.
 Shelburne and Charlotte (VT) Rescue Practice
3) Wear flotation
Nobody expects to fall through but almost every ice sheet has places where it is possible and some of those places may be hard to see. After a few minutes in the water, you loose your ability to swim, rescue yourself or assist others in helping you. If you are not successful at getting back on the ice, you may not be able to keep your mouth and nose above the surface. With floatation most people will survive an hour or more before they become unconscious from hypothermia. That often provides enough time for rescuers to get to a victim (typical times range from 15 to 45 minutes). Flotation can be in the form of a life jacket, float coat, flotation snowmobile suit, dry suit, or a backpack (with a hold down strap) that has a dry bag full of dry clothes. More...
Automatic inflating lifejackets are not recommended.
4) Don't Drive on Ice
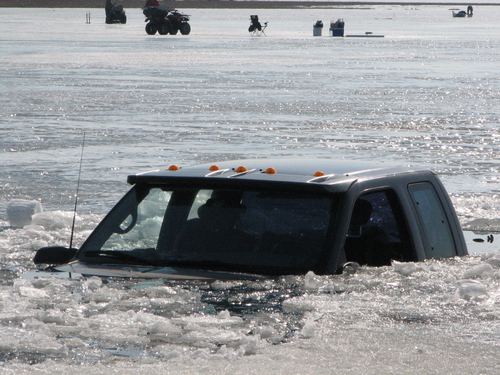
About half the bad accidents on ice are a result of driving vehicles (snowmobiles to trucks). A pickup truck on ice has a lot in common with a two ton stone. Weather near or above freezing is a factor in many vehicle break-throughs. Pressure ridges are a common place to break through. They are hard to predict, sometimes hard to see and often in the way of where people want to go. More...
5) Don't Take Ice for Granted When Bringing Others
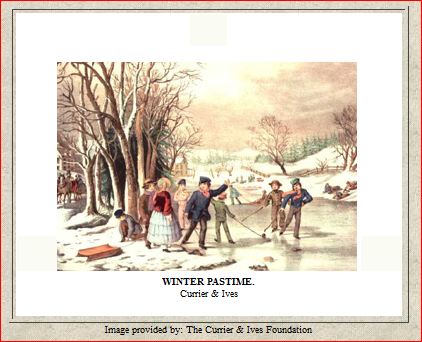
The worst outcome of an ice accident is having someone else get hurt or worse as a result of your decisions. Ice can be unpredictable. Keep that in mind when bringing children, friends and pets who don’t know what they are getting into (more on Kids and Dogs). The risk profile for activities on lake ice has more in common with moderate mountaineering than the Currier and Ives view that many approach ice with.
If someone breaks through the ice, make sure someone calls 911 immediately. If you follow the typical impulse you are both likely to wind up in the water. If you have enough people with local knowledge, have someone find the best place for Rescue to get access to the victim(s).
Quickly assess what you have: people, boats, life jackets, more people, rope/hose/extension chords/etc. Remember the standard sequence of :
Preach: Tell the victim which way to go. Encourage them
Reach: Reach with a rake, long stick, boat with a rope on it
Throw: Throw rope, improvised throw rope
Row: small aluminum boats are more stable than canoes, kayaks
Go: Last resort.
With kids, it is easy for them to get far out on thin ice that will not support you. Life jackets will dramatically increase survival time. A test pole and some training will go a long way toward finding thin ice . The 'body weight test method' is a widely used but foolish way to see if the ice is strong enough. A throw rope might save the day. Ice claws (with training) makes it easier to get back on the ice.
If you are taking kids on wild ice (especially young ones) it is very important that you have plenty of ice experience and equipment It is also important to thoroughly check out the ice yourself before taking the kids out.
6) Stay off the ice at night
You find most ice problems with your eyes so finding them at night is much more difficult. Your ability to rescue yourself or others is also diminished. Vehicles and darkness is an especially bad combination. More...
7) Injuries Associated with skating
Being injured in a fall is almost as likely as falling through (most of these injuries are minor). Developing a keen eye for potential hazards, being vigilant about looking for them even at the end of a long day will avoid many problems. Skating fast down wind is inviting a particularly hard fall. Generally you should not skate with both skates on the ice as is often done when skating down wind.
Wearing pads (helmet, elbow, hip, knee) will make falling less painful and is important for older skaters. If you fall on something hard like a camera or water bottle that is carried in front of you the impact will be concentrated. The best place to carry things is either in a pack (with other soft stuff) or off to the side where you are less likely to fall on them.
Slips and falls can take place with other people on foot. Foot traction is very helpful in the parking lot and on the ice sheet.
8) Thaws are periods of above freezing temperatures. They are a significant factor in about half the ice fatalities. The early season has its share of warm spells. Thin new black ice can weaken substantailly in less than a hour.
January and February are, on average, less cold than in the past. Midwinter thaw are more common.
They are most pervasive in the spring when sun is strong and temperatures can be well above freezing, sometimes for over a week. The ice can be thick but not strong.
The thawing process is quite different than the reverse of ice sheet growth. Thaws are often measured in Thaw-Degree-Days (FDDs). 15 thaw degree days with some wind can fill an ice sheet with wind holes and hide previous hazards like folded ridges. Calculating the the FDDs of thaws in the recent past is a useful tool.
(TDD=average daily temperature minus 32)
It is easy to overlook what the weather was like a week ago. looks the same after a week of near freezing temps that it is strong enough. In the spring it is very common to have the surface of the ice sheet harden up overnight but weakens dramatically when it warms up later in the day. Thickness of the ice sheet can be a poor way to assess strength.
More on thaws:
These eight steps are only a start. The rest of the site has lots more to say on these and many other aspects of minimizing risk while enjoying one of Winter's great treasures.
Bob
