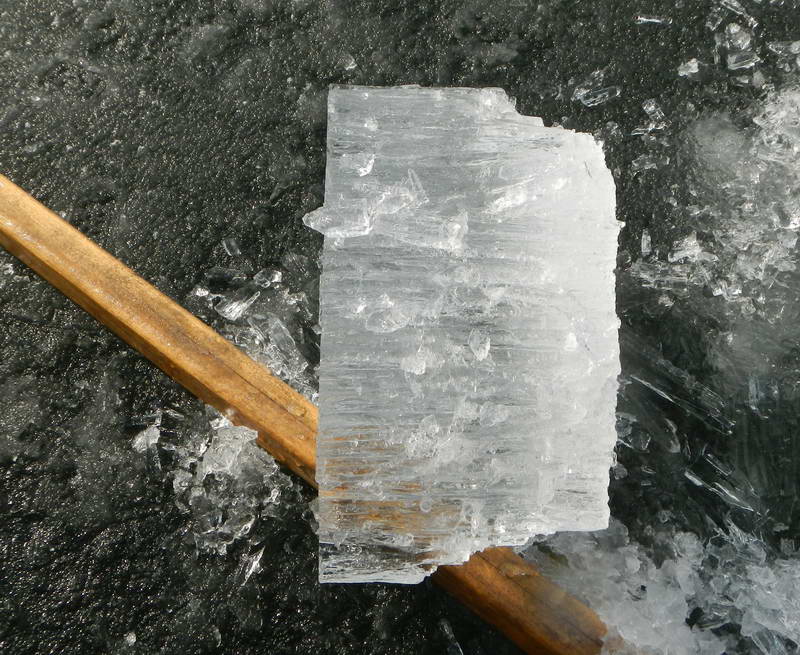
 7-1/2" thick, stage 5(rotten), S2 (small grain) ice. The test pole will go through with one jab of the sharp or blunt end of the pole. You can't quite stomp through the ice but probably will be able to in an hour or two.
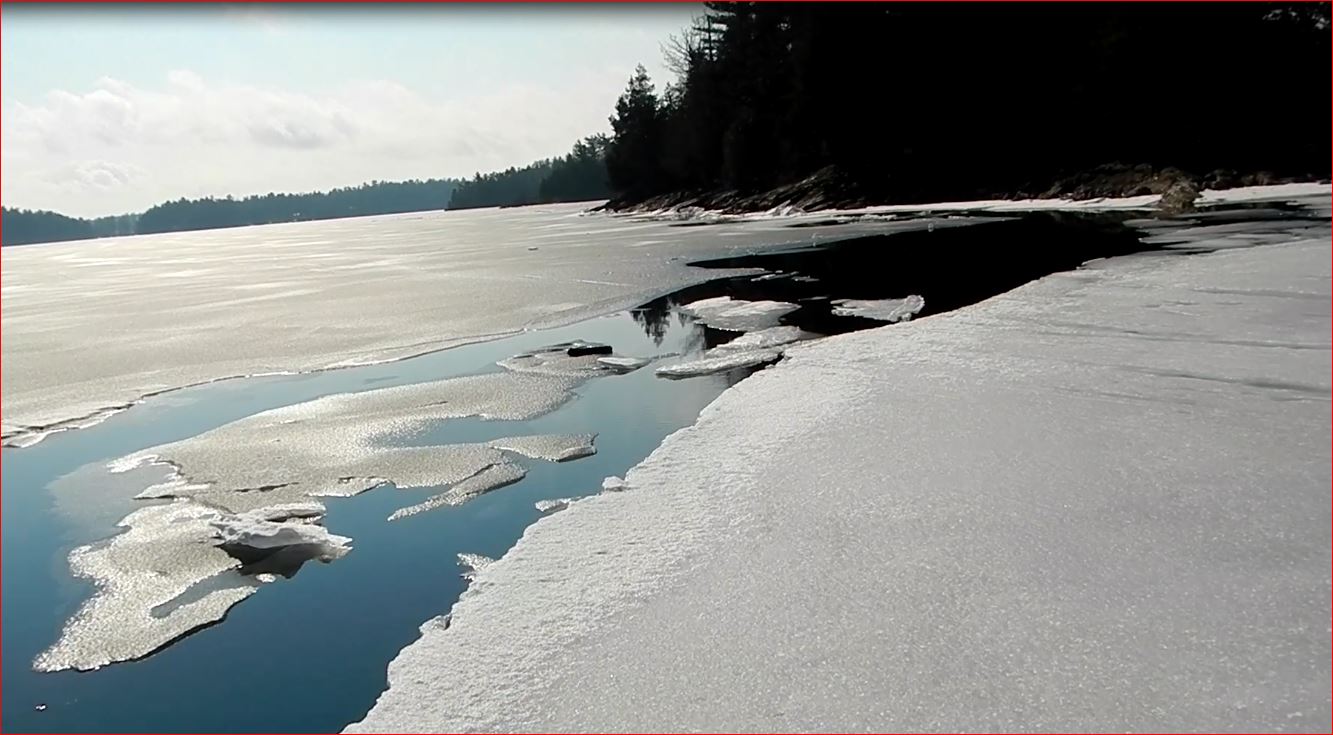
Thawed Ice
Summary: Based on press reports of 2013 season ice mishaps, ice during or after a warm spell accounts for more breakthroughs than thin but cold ice. Relatively short warm spells can create a bunch of new hazards, some of which can last for several days or even weeks after the thaw ends. Knowing the temperature, wind and sunniness history for the past seven to ten days can give you a good idea of when to expect ice weakened by thawing. Knowing when to get off or stay off the ice in thaw conditions is a key skill for staying dry (and alive).
The following describes thawing processes, important factors, styles of thaw events and a straightforward way to predict the amount of thickness loss during a thaw. It is intended for body weight activities although the same principles apply to heavier loads. The key thing to remember is the amount of thaw is the largest factor in determining the risk of falling through. Well thawed ice that is well over a foot thick may not support a person while cold ice that is two inches thick will do so with a reasonable safety margin (on a small lake).
Detail: Thawing is the process of ice decay. Thaw conditions can occur anytime during the ice season. The minimum thickness recommended for activities on cold ice gets a lot of attention but more people break through ice that is weakened by thawing than break through cold ice that is too thin. Roughly half the fatalities in North America probably would not have happened if the weather had stayed consistently below freezing for 10 days prior to the accident.
Many people (myself included) seem to have a hard time deciding when it the ice is getting too thawed to be sufficiently trustworthy. Being especially well prepared for falling through and having enough ice experience to have a sense of when it is likely to get too weak are very important.
Thawing occurs in four ways:
A) Top Surface Melting is most strongly driven by warm wind. A 24 hour, 50 degree thaw with winds in the 20-30 mph range can melt a couple inches or more of ice. Holes of several types and sizes are also common after a windy thaw. Heavy rain over 24 hours with only moderate wind will result in about an inch of ice loss. Most of that is from the warm air. Drain holes are common in this situation if the ice is less than about 6" thick.
B) Internal melting is driven most strongly by sunlight but also occurs slowly in cloudy conditions. This causes relatively slow loss of thickness but can dramatically weaken the ice. Thicker ice takes longer to weaken but it also takes longer to recover its strength when the weather turns cold. In an advanced thaw state (stage 6), small grained ice can get so weak that 14" of ice will not support a person. More on rotten candled ice...
Melting takes place at triple junctions, grain boundaries and at imperfections in the crystal structure. At boundaries, this is driven by the elevated salt content and, for triple junctions, the geometry of the grain edges at the junction (more curvature = slightly lower melting point).
Internal melting also takes place within individual crystals. In general this affects strength less than melting at crystal boundaries. More...
Internally thawed ice fatigues from vehicles driving over it. This makes it significantly weaker than nearby ice that has not had the repeated loading by vehicles. The same thing can happen on thinner ice as the result of multiple people walking or skating over the same place. While the something similar can happen with cold ice it is more likely to be a problem in warm conditions.
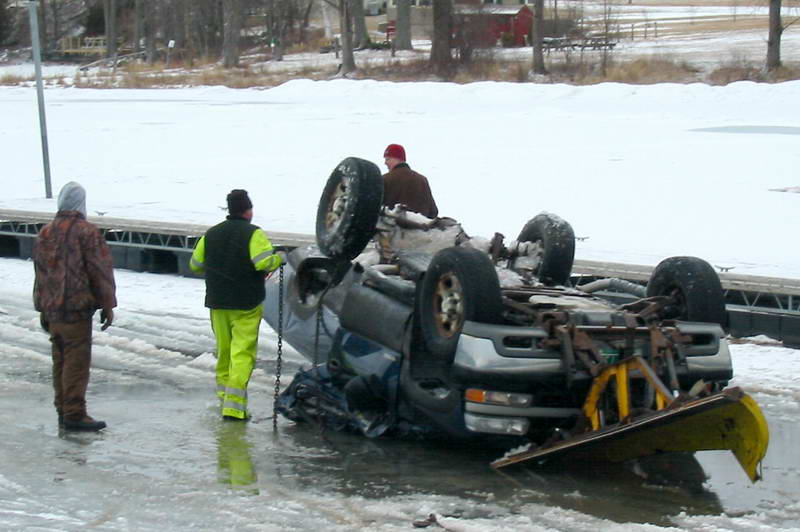
This truck was headed out to help another vehicle that had broken through when its wheels punched through a fatigued 14" ice sheet about 200 feet from the the ramp on Mallets Bay Vt. The tow truck pulled the pickup from shore and flipped it over in the process. Photo John Zierman.
C) Under-ice Melting is most commonly caused by turbulent currents in the water under the ice. It is common in rivers, lakes with river like characteristics, under bridges, and over reefs and deltas from side streams in rivers and with features like gas holes. Underice melting also takes place in shallow water (especially ponds) when sunlight heats the pond water enough to cause melting of the bottom of the ice sheet.
D) Wind driven rafting: When the ice is weak enough or the wind is strong enough the ice may be pushed over itself at pressure ridges or onto the shore. Large scale rafting is most common on thaw weakened ice that is between a couple inches and a foot thick. For the wind to get enough grip on the ice the ice sheet is typically several miles in dimenstion. The wind needs to be 20+ mph and most thick ice rafting takes place a winds in the 30's or more. On thin ice, rip outs also occur. Rafting and ripouts creates open water that is stirred by the wind, bringing warmer, deeper water to the surface.
The effects of a thaw is a combination many factors: listed here in rough order of importance for people on foot:
- Ice thickness: Two inch ice can be weakened enough to be dodgy for walking on the ice in a couple hours in moderate thaw conditions. A foot of ice normally would take several days to get as weak in the same conditions.
- Ice strength more important than thickness: On cold ice, thickness almost always is proportional to strength. Thawed ice is weaker anywhere from a little bit to over 90%.
- How warm and how long: This most easily measured in thaw-degree days: = (average temperature-32)*Days
- Wind: warm wind is natures Zamboni, often bring a rough, snow covered ice sheet back to skatable smoothness or, if it is really windy, turning it into an unskatable, deeply scalloped surface. Puddle holes develop in warm winds above about 20 mph.
- Ice type: Small grain ice (type S2) weakens significantly more in the advanced stages of thawing than large grain ice (S1).
- Sunlight drives the internal melting process causing the ice to become porous (stage 3) and to become weak in the later stages of the thaw. Sunlight also melts ice along shorelines facing the sun making getting off the ice tricky. Sunlight also can heat the water under the ice. This is more of a problem in shallow ponds and shallow areas near shore. Deeper lakes allow warmer water to sink and be mixed with the deeper water. The mid-day intensity of sunlight at 45 degree lattitude is about 270 watts/sq meter in December and about 600 watts/sq meter in early March. This makes a big difference in how fast an ice sheet weakens.
- Rain has relatively little effect on ice. An inch of rain falling in 40 degree air temps has enough thermal energy to melt about 1/16" of ice. The wind that often accompanies rain accounts for most of the thickness loss of an ice sheet in a storm. Large puddles from heavy rain are likely to form larger drain holes as the cloudy conditions don't generate lots of triple junction pores to drain the puddles through many small holes.
Stages of Thawing:
It seems reasonable to break thawing into stages ranging from cold, hard ice to something you can't walk on. The following description of 'stages' is intended for adult body weights. It is not a clasification that is currently used beyond this website.
Stage 0) Unthawed ice that is below freezing everywhere except at the the bottom of the ice sheet.
Stage 1) Cold hard ice Sunlight forms vapor figures in S1 (large grain size) ice.
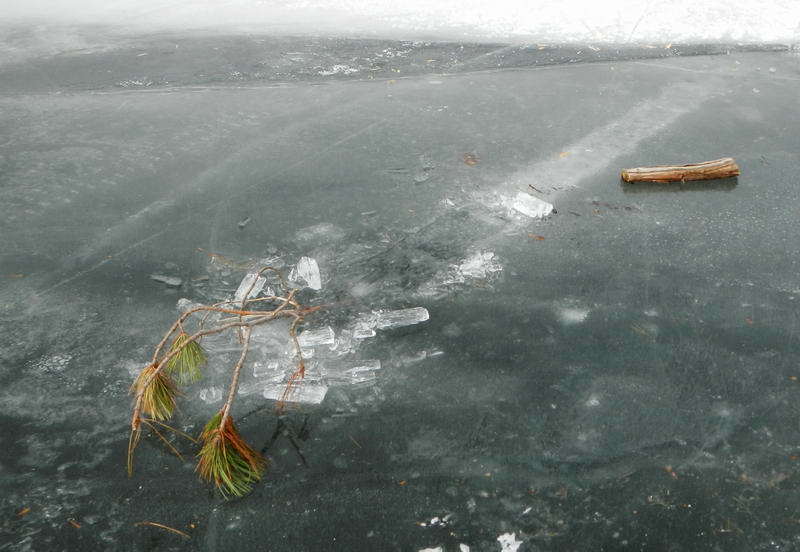
Stage 2) The Puddle Stage: Ice with puddles of melt water or rain. Surface texture shows up in ice that is above the puddle level.
Very occasionally I have seen puddles that have a whorpool. In one case it was a 10" puddle at the center, about 100 feet in diameter. The ice sheet was about probably S1 ice. It took about an hour to drain the puddle. It is possible that the hole was made by a fisherman's drill and even that the puddle water was pumped up through the hole with a power drill.
Folded ridges often have puddles associated with them.
Stage 3) Drained Ice is ice shortly after the puddles drain through the ice sheet through pores made by internal melting of of triple junctions and grain boundaries and/or drain holes. If the ice is thick, this is a good time to get heavy things off the ice until there is enough cold weather to refreeze the internal melting. If you are on foot and the ice is thin (less than ~3") it might be dicey at this stage. If you can, stay off areas of small grain ice on your way back to shore. Surface texture of S2 ice is usually obvious. A test pole is very handy for deciding where your next steps should be.
In a cloudy thaw on ice less than about 8" the internal pores may not develop sufficiently to drain the surface puddles. The water will drain through any pores that do develop as well as wet cracks and fishing holes. They can erode into larger drain holes, some of which are plenty big enough to catch a foot, a skate or an iceboat runner. Surface texture is usually less obvious in this situation.
Stage 4) The weakening phase: continued surface and internal melting. At this stage vehicles often break through ice that would support them if it were cold. Surface texture is usually obvious. Melt figures are often pentiful in type S1 ice exposed to sunlight. This causes the ice to become cloudy and grey. S2 ice (small grain size) is typically dark and uniform looking.
7" S2 (small grain) ice late in stage 4. Ice that looks like this is often called 'candled ice'
 Dark phase S2 ice late in stage 4, around noon on what has been a sunny day.
This picture was taken three hours later at a nearby location on the same ice sheet. It may have turned white from a small amount of snow falling on the surface or simply melting out from under the surface leaving a layer of white corn ice (radiational cooling can harden the top mm or less of the ice sheet (corn ice). Surface color of of thawing ice sheets is not a reliable way to assess the state of thaw of an ice sheet. It can be either white, light grey or dark gray in the same thaw state. The ice in both pictures is type S2 in late thaw stage 4.
Melted ridge at stage 5. Ice in ridges usually rots faster than sheet ice.
Stage 5) Rotten ice: Rotten ice will barely hold up single people. A test pole or spud will go through 6 or more inches of rotten S2 ice in a single hard jab. As more internal melting takes place the failure mode of the ice changes from flexural failure to vertical shear failure where a plug of ice is pushed vertically downward through the bottom of the ice sheet. This is most pronounced in S2 ice. On rotten S2 ice you can sometimes feel the ice crystals shift under your foot as you put weight on it....a good time to start wondering why you decided to come out on the ice today.
Stage 6) Ice that will not support people on foot. Many fishing fatalities involved going out ice that is at stage 5 and staying until it goes to stage 6. Ice can go from stage 4 or 5 to stage 6 or even stage 7 very quickly (less than an hour). For example, thicker ice that was in stage 6 yesterday afternoon and picked up a little overnight ice that feels firm this morning will not last long in a strong spring sun. Rotten candled ice is the source of most thick ice breakthroughs by people on foot and it also is behind many vehicle breakthroughs.
When you break through you might be able to lift yourself out on the ice in front of you and belly crawl or roll to better ice but your best bet will usually be turn around and go back in the direction you came from. A test pole is very handy for finding weak ice before you break through.
Stage 7) Ice that will not suport people in a prone position when trying to get back on the ice.
In stage 7, the ice is so rotten that once you make a hole in it, the crystals just keep pealing off the sides into the hole making getting out especially difficult. It is a slow process to repeatedly swim/drag yourself onto the ice only to have it disintegrate. If you fall through it is generally best to turn around and try to get back on the stronger ice you were on before you broke through.
If you have been fishing in the same place for a while and the ice has gone from stage 5 to 7 you are in a tough position. You may be able to see stronger ice (probably lighter color) and stay on that or find large crystal size that is stronger. A test pole (or spud) is very helpful for figuring out if the ice you are considering walking on is likely to hold you up or not.
For wing and kite sailors as well as cross country skiers, skis may spread your weight enough that you may be able to cross ice in this state. If you do break through you may find yourself too far from ice that will support your weight and out of reach of a friend's throw rope. Click here for a video made by Kyle Deane, kayaking through stage 7, S2 ice. The crystal size is very small (0.2"??). It is impressive how little force it takes to push a paddle blade through its thickness. At its weakest, several inches of stage 7 ice will only support a pound or so.
For people who like to swim under water, ice is MUCH harder to break through from the bottom than from the top. On top you are heavy and surrounded by a low viscosity, low density fluid (air). Under water you weight nothing or less than nothing and you are surrounded by a high viscosity and high density fluid that greatly inhibits your ability to deliver high impact blows to the bottom of the ice.
Overnight Ice: The surface of ice in this state often refreezes over night and feels pretty good in the morning but as that surface layer of hard ice softens the ice sheet can revert to the weak condition it had late the previous afternoon. For fishermen in particular it is the source of many breakthroughs and fatalities. As is often said on the fishing forums: no fish is worth dieing for.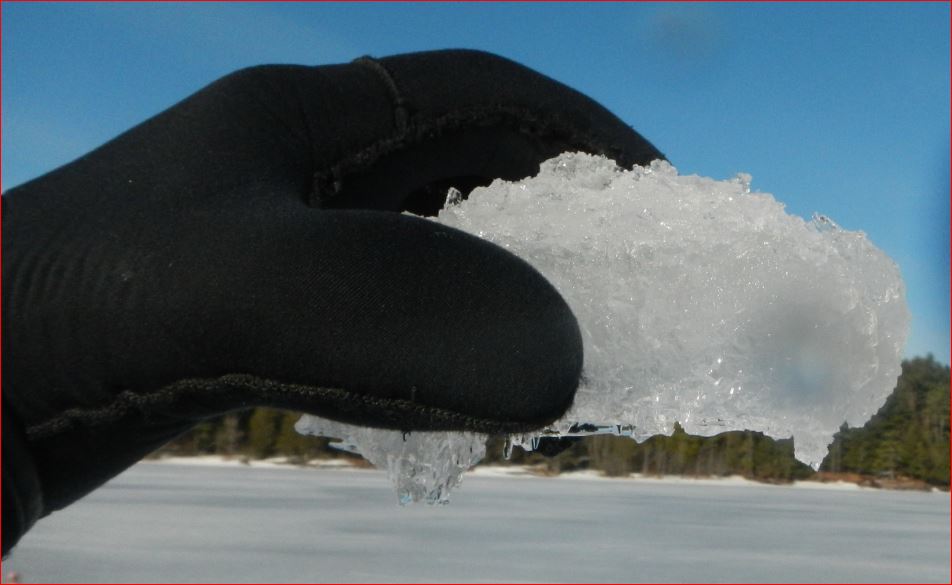
Overnight Ice: One inch thick frozen surface of a 2" deep slush from a night that put 3/8" (8 mm) of ice on puddles. This suggests that the slush was about 16% water. The frozen crust was getting soft by mid morning (April 7).
Assessing the Stage of Thaw
For people on foot, a test pole or spud is the best. If it goes through in a hard jab the ice has gotten too weak. Jabbing the ice at a low angle (roughly 30 degrees above horizontal) will give you a good idea of what is going on at the surface. On cold ice the ice comes out as thin, conchoidal chips. Warm ice comes out in chunks: little ones for small grain ice and bigger ones for large grain ice.
A drill is handy for looking at the deeper parts of the sheet. This is especially important for heavy loads. If you drill a hole about 3" short of the bottom and remove the chips you can see how fast the hole fills with water. If a little water comes in, the ice is starting at thaw stage 3. If it comes comes on very fast (filling in 10 seconds or less) This shows the ice is in Stage 4 or higher. If the ice is well thawed (stage 4 and 5) the drill chips come off as chunks rather than shavings. You can do an approximation of the drilled hole by chipping out a shallow pit in the ice with a spud (ice chisel) or test pole.
Using a drill is also a way to look at the effect of fatigue. A partial depth hole drilled in the traffic lane will leak much faster than one drilled off the traffic lane.
You can also use the blunt end of your test pole to pound the ice. If it is in thaw stage 5 or 6, you can knock a plug of ice out with a hard hit or two. Once you have a hole you can see how easy it is to pick crystals off the sides of the hole. Note: The 'blunt end test' works best with wooden test poles and spuds. Nordic test poles are too light.. In stage 5 you can often knock a hole in the ice with your heel. In stage 6, just stand on one place for a while and you will make a body sized hole.
Predicting Thickness Loss during a Thaw
George Ashton developed a simple method for predicting ice thickness loss based on the number of thaw degree days. (Click here for his paper: PREDICTING LAKE ICE DECAY). Based on ice decay measurements done by M. A. Bilello, Ashton found the average thickness loss was 0.15"/Thaw degree-day. Bilello's work was done in Canada and Alaska and he found the minimum rate was 0.08"/TDD and the maximum was 0.28"/TDD. On Post Pond NH, based on nine years of data, 0.15"/TDD looks reasonable. The rate might be a little less on a deeper lake, in prolonged light wind conditions or a cloudy period.
Expressed in TDDs/inch of thckness loss:
Average rate of melting 6 TDDs/inch of loss
Maximum reate of melting 4 TDDs/inch of loss
Slowest rate of melting 12 DDs/inch of loss
Styles of Thaw Events:
Moderate wind and warm weather: A day of moderate temperatures with some wind (15-25 mph) can do a lot of melting.
- Surface melting of a couple inches a day or more may occur.
- Wind driven puddles are likely to form and get impounded by the wind against higher features on the ice sheet (typically snow ice bands or frozen ice edges)
- Puddle holes might form.
- Thin ice melts completely in pressure ridges and over gas holes.
High Wind and Warm Weather:
Winds in the 30 to 50 mph range are not very common in most places but when they occur they are able to do a number of adverse things to ice.
- Surface melting at a rate of 2+inches/day is likely.
- Wind scolloping of an ice sheet is common, especially if the temperature is above 50 degrees. This can make it too rough for skating and sailing.
- Gas hole roofs melt
- Areas with ice affected by currents thin or melt completely. Examples include under bridges, passages between large bodies of water, pressure ridges, ice over reefs, gas holes, etc.
- Puddle and wind holes form
- Ripouts and blow-outs can occur in ice less than a few inches thick. This can also happen in cold weather but is more likely to do so if the ice partly thawed.
- Finger rafting of thicker ice (up to a foot). This is associated with lead formation on the upwind side of the lake and large areas of broken and shifted ice that is often full of wide cracks and open areas between broken plates that have been moved. Ice shoves are often part of process. Thick cold ice is less likely to finger raft or shove but, given a long enough fetch and high enough wind it can still raft and pile on leeward shores (ice shove).
- Puddles may form on the the ice from windblown water.
Moderate temperatures, lots of rain and little wind:
- Roughly an inch of surface melting/day is common but rain water is usually too cold to contribute much. Most of the melting is related to warm air.
- Deep (4-12+") puddles may form as rain water pools and locally depresses the ice sheet.
- Drain holes are likely to form if the ice is not porous enough to keep up with the accumulating water.
Moderate temperatures, lots of sun, light wind:
- Lots of internal melting
- Softening of the surface, especially on S2 ice and snow ice.
- Weakening of the overall ice sheet
- Often gets overnight ice making the sheet feel solid in the morning (even though most of the sheet is in stage 4 to 6).
Multiple days with temperatures around freezing: It is common in most of the ice belt to have a few cloudy days in a row with temperatures that stay below 40 during the day and may not get below 30 at night. The ice develops porosity as the grain boundaries start to melt. Places like access ramps that have vehicle traffic get weakened further by the concentrated load under the tires causing the grains to shift and loose connection with each other (fatigue).
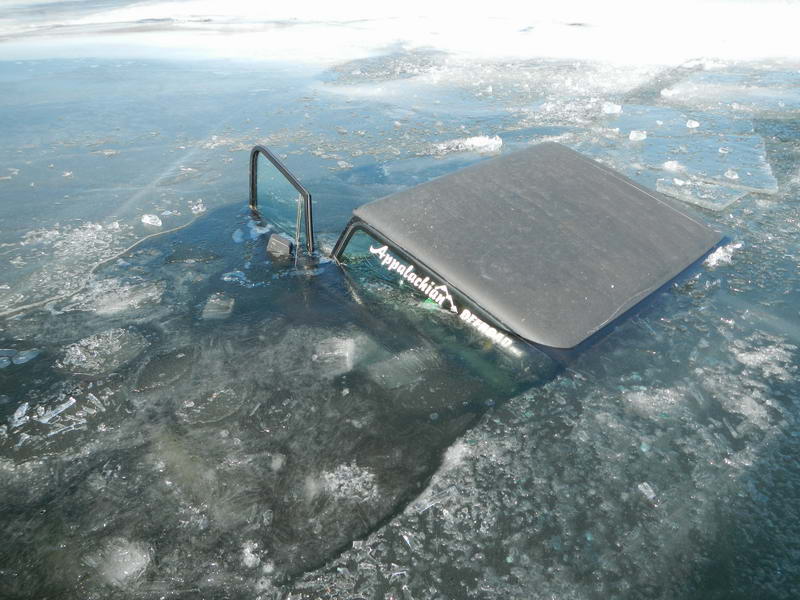
In one example 23 thaw-degree-days over seven days resulted in the breakthrough that resulted in the flipped truck shown above. In another example below a vehicle tire punched out a a section of relatively unfatigued 6-1/4" small grain ice with 18 thaw-degree-days over 5 days. They managed to keep going but a Jeep coming by later was not so lucky.
 A vehicle wheel punched a 6" wide, two foot long hole in stage 4 (weakening) small grain ice (type S2) but climbed back out. The water here was over 10 feet deep.
 This jeep landed on a rock reef about 15 feet south of the punch through shown above. The owner and a bunch of friends recovered it successfully with little damage to the vehicle.
Rivers: Rivers typically loose their ice sooner than lakes and they can do it very quickly. In a frozen river as soon as warm water enters the river it get cooled off to about 32.1 deg by the ice sheet and flow related turbulance in the water. This thins the ice sheet unless there is as much cooling of the ice by cold air temperatures over the ice sheet. In 2015 I watched the Winooski River melt. Melting stared up stream below the Marshfield Dam, near its headwater. At the mouth of the river the ice did not change thickness significantly for another week until some 34 degree water started to show up in the bottom of the water column. It was open water a couple days later.
In 2016 the Winooski River ice went out in a couple of days when 2.5+ inches of rain fell on the watershed. The ice accumulated in jams but did create a lot of ice jam related flooding. Two days after the storm the river was mostly ice free.
Salt Water: Brackish or salt water ice starts weaker, weakens more quickly, and at lower temperatures than fresh water ice. Going on salt ice in any conditions and expecially in warm conditions, requires knowledge that is not found on this website.
Recovery after a thaw ends: The ice typically recovers after a few cold days although it is often different with new weak areas to identify and avoid. It takes longer to be strong enough for vehicles or if there is an insulating layer of snow on the ice.
